Firmware Update
After installing the app, please do a firmware update immediately by following the instructions below.
Firmware update
In PyLife, go to the ‘Devices’ tab and select your PyGo:
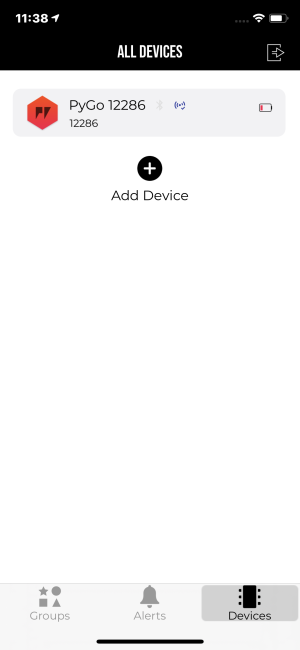
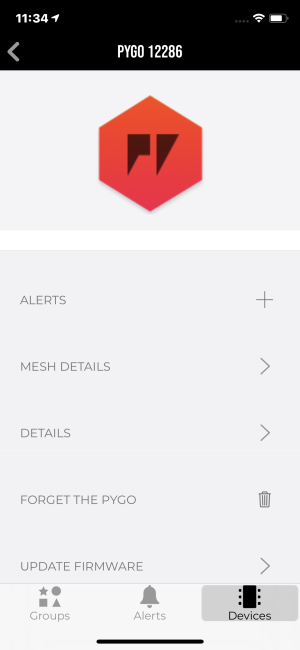
Scroll down to the bottom and select ‘UPDATE FIRMWARE’
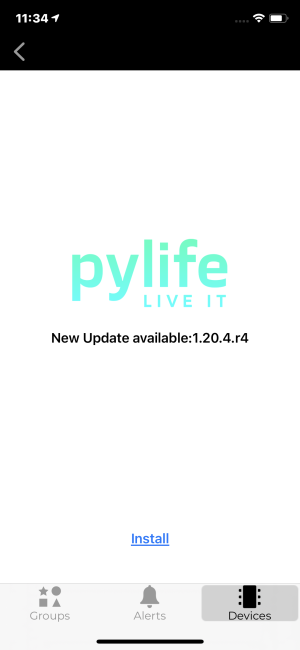
If an update is available, click install
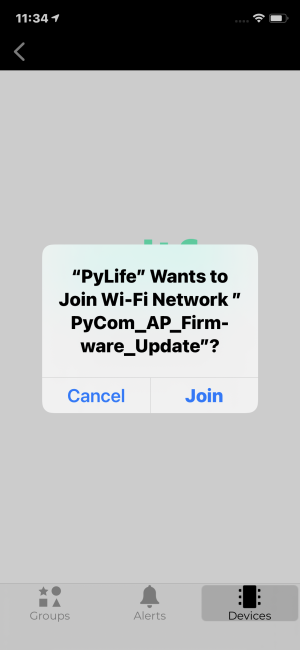
You will be prompted to join a new WiFi access point. Please click join. You will temporarily be disconnected from the internet, so if you have any active connections they will be terminated.
After a few moments the firmware update should complete, and your PyGo will automatically reboot. Once it has reconnected, you are ready to go.
Recovery mode
If you have removed your device while it is in firmware upgrade mode, or the app does not allow you to update your device, please try the recovery mode. You can find this at the bottom of the device tab:
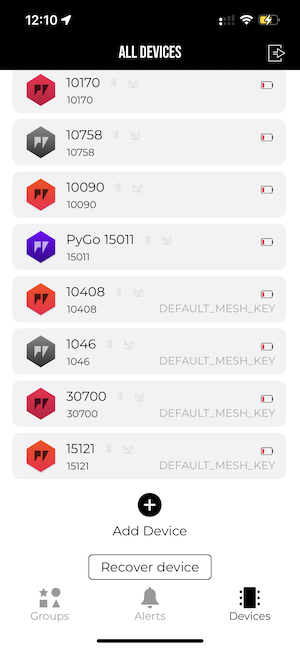
For Android users: Until the mobile App has been approved by Google and is available in the Google Play store, you can get the latest version with recovery mode here: https://software.pycom.io/downloads/device-recovery.apk
Please choose the device type (PyGo 1 or PyGo2) and wait for the mobile app to prompt you to connect to the WiFi network of the device to be recovered. Please make sure that the device to be recovered is close by and no other devices in firmware upgrade mode are close by.
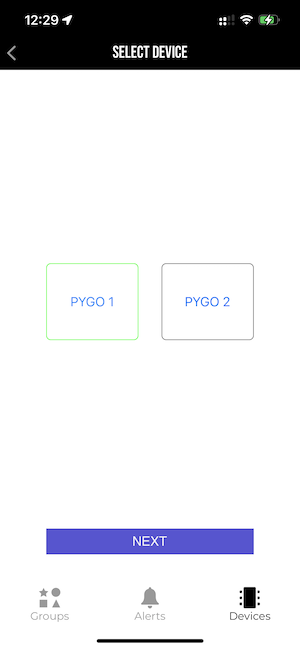

Please do not use your mobile phone for other activities such as WhatsApp calls at the same time. It is also advised to not use Bluetooth headsets during the upgrade. If you are prompted to join another WiFi network or switch to cellular connectivity during the upgrade, please either ignore or choose to stay connected to the current WiFi network.
Troubleshooting
If the firmware update fails, you can reconnect to the PyGo and try again. It will prompt you to resume the update, and should subsequently update successfully. This should fix the majority of firmware update issues. A video demonstrating this is available here
PyGo not responding
If your PyGo stops responding in PyLife, and doesn’t display a charging symbol when placed on a suitable charger, it may have entered an error state. We have discovered a bug in the firmware the PyGos are shipped with where in unusual circumstances involving the GPS the PyGo can enter this state where it does not respond to external input. The immediate firmware update resolves this issue, but if you do encounter please do the following:
- Leave the PyGo off the charger until the battery is discharged (this may take a day or so, but will be much quicker if the battery is not fully charged)
- Wake up the PyGo by placing it in a charging cradle
- Restart the update process. PyLife should prompt you to resume the update, and fix the issue.
Manual firmware update from computer
For most people, performing the firmware update through the app is the best option. However, it is possible to update through a computer using the USB cradle or your device is already in upgrade mode.
If your device is not already in upgrade mode from a previous upgrade attempt, please install Atom or Visual Studio Code and enter the REPL prompt in the Pymakr plugin. Alternatively you can use PuTTy or minicom as Terminal programs

The above screenshot shows the usual startup messages from the PyGo when in application made. Wait for these commands to complete before issuing the
upgrade()command.
Please follow these steps to upgrade your PyGo on your PC:
- Download the relevant firmware for your PyGo. Click on the relevant link below which will initiate the firmware image download.
2a) If your PyGo is still in application mode, connect to your PyGo’s REPL via Atom, Visual Studio Code, PuTTy or minicom, and run upgrade()
2b) If your PyGo is advertising a WiFi network with the name PyCom_AP_Firmware_Update, your PyGo is already in upgrade mode and you can continue to the next step.
-
On your computer, connect to the PyGo’s access point:
- SSID: PyCom_AP_Firmware_Update
- Password: www.pycom.io
-
Open up a command prompt or terminal, navigate to the directory your downloaded firmware is in, and run the following, replacing YOUR_FIRMWARE_HERE with firmware you have downloaded:
Ensure that you run each command separately and check the output. You should see a line “Status: OK” in the output for commands that do a --request GET. Please note the ota-reboot command may not return a result and seem to hang. You can check if your PyGo is showing the usual start-up messages after the upgrade is complete.
Pushing the firmware binary to the device (command with --request POST) can take several minutes so please be patient.
curl -v --request GET http://192.168.4.1/status -H "FW-Header-1: ota-init"
curl -v --request GET http://192.168.4.1/status -H "FW-Header-1: ota-update"
curl --request POST --data-binary @YOUR_FIRMWARE_HERE.bin http://192.168.4.1/update
curl -v --request GET http://192.168.4.1/status -H "FW-Header-1: ota-finish"
curl -v --request GET http://192.168.4.1/status -H "FW-Header-1: ota-verify"
curl -v --request GET http://192.168.4.1/status -H "FW-Header-1: ota-reboot"
For example, if you’re using MacOS with a PyGo1 and have download the current PyGo1 firmware to the ~/Downloads folder:
cd ~/Downloads
curl -v --request GET http://192.168.4.1/status -H "FW-Header-1: ota-init"
curl -v --request GET http://192.168.4.1/status -H "FW-Header-1: ota-update"
curl --request POST --data-binary @firmware_pygo1_1.20.4.r4-pylife.bin http://192.168.4.1/update
curl -v --request GET http://192.168.4.1/status -H "FW-Header-1: ota-finish"
curl -v --request GET http://192.168.4.1/status -H "FW-Header-1: ota-verify"
curl -v --request GET http://192.168.4.1/status -H "FW-Header-1: ota-reboot"
For Windows users, the curl command is included in Windows 10 since insider build 17063. For older versions of Windows, please download the curl application from https://curl.se/windows/
- Check that all commands have run successfully without error. Your PyGo is now upgraded and you should see the startup messages as shown in the screenshot above.